• Home
  • Home
  • Home

Saturday, February 27, 2010

Chicken Fried Rice

by Ellie Weightman, adapted from "Cooking with Paula Deen" cookbook

3 cups cooked rice (see RICE below)
2 boneless skinless chicken breasts, cut into bite-size pieces

4 1/2 tbsp low-sodium soy sauce
3 tsp sesame oil, (toasted or reg)
2 large eggs, beaten
¾ cup chopped carrots
½ cup chopped celery
½ cup chopped onion
2 cloves garlic, minced
1 cup broccoli florets
4 oz sliced mushrooms
4 oz sliced water chestnuts, drain and rinse
½ cup frozen peas, thawed
1/8 tsp crushed red peppers

Garnish: Sesame seeds, chopped green onions

In a zip lock bag, combine chicken and 1 ½ tbsp soy sauce; massage and let sit 30 minutes while you chop your vegetables.

Remove chicken from soy sauce, discarding soy sauce.
 In a large wok, heat 1 ½ tsp sesame oil over medium-high heat. Add chicken and cook stirring occasionally for about 3 minutes or until cooked through. Remove with slotted spoon; set aside and keep warm by covering.

Add eggs and cook 2 minutes, stirring constantly until scrambled. Remove from pan; set aside and keep warm by covering.

Heat remaining 1 ½ tsp oil. Add carrot, celery, onion, garlic and 1 ½ tbsp soy sauce, cook for 4 minutes, stirring occasionally.

Add broccoli and mushrooms and cook for 5 minutes or until tender.

Stir in pre-cooked rice, water chestnuts, peas, red pepper flakes, cooked chicken and any accumulated juices, scrambled eggs and remaining 1 ½ tbsp soy sauce.

Garnish with sesame seeds and green onions if desired. Serve immediately.

NOTE: Be careful adding any additional soy sauce, can be salty, so go easy.

RICE: Cook your rice earlier in the day or the night before. Put in bowl and cover. Put in refrigerator. If rice is pre-cooked and cool, it will not mush in the wok. You can use white, brown, long grain, basmati or whatever your preference.

Sunday, February 21, 2010

Freezing Garlic

by Ellie Weightman

Buy your garlic in bulk, Sam's sells a large net filled with garlic for approximate $2.28.

Pull apart each head of garlic, separating each clove.  Remove the garlic paper from each clove.  Remove the top and bottom of each clove with a sharp paring knife.

Place all the cloves of garlic in a freezer bag, add a tablespoon or so of olive oil.  Close the bag, removing all the air then massage the oil into the garlic being sure that it looks like all the garlic is coated in the oil.  Mark the bag with permanent marker.  Lay flat in freezer only until frozen so avoid the garlic clumping together, then you no longer need to keep it flat.

To use: simply remove the amount of cloves you need and use a garlic press to chop. 

This method is excellent for using garlic in cooking, however, for dishes where you want fresh chopped garlic, this method may be work as well since it will be slightly soft after thawing.

I keep one head of garlic aside for fresh usage and freeze all the remaining garlic for cooking.

Homemade Bread Crumbs

by Ellie Weightman

1 loaf multi-grain bread
1/2 loaf whole wheat bread

Note:  You can use any type of bread you prefer

Preheat oven to 300 degrees.

On a large cookie sheet, place pieces of bread without overlapping.  Bake for 8-10 minutes, then turn and bake other side for 8-10 minutes.  Remove from oven and let cool.

Continue baking all the pieces of bread until complete.

After cooling, break each piece of bread into quarters.  Place the pieces of bread in a food processor, you will have to do this in batches - usually one cookie sheet of bread will fit in a 12 cup  processor.

Pulse at first, then run consistently until the breadcrumbs are of the consistency you prefer.

Allow to cool.  After cool, place in a freezer bag, squeezing out the air and store in your freezer for up to 3 months.  Lay the bag flat at first until the breadcrumbs are cold to avoid clumping, then you no longer have to lay flat.  Mark the bag as well as the date they will expire.  Scoop out as necessary for each of your recipes.

Buttermilk Drop Biscuits

by Ellie Weightman

2 1/2 cups SELF RISING FLOUR
2 tsp sugar
1/4 cup butter or margarine
1/4 cup shortening (or 1/2 cup butter and omit the shortening)
1 1/4 cup buttermilk

Preheat oven to 450 degrees.

In medium bowl, whisk together the flour and sugar.  Using a pastry blender or fork, cut in butter/shortening until crumbly.  Stir in buttermilk until dough leaves sides of bowl.  Drop dough by rounded tablespoons or a large muffin scoop onto a cookie sheet 2 inches apart.

Bake 10-12 minutes or until golden brown.

Makes 12 -18 biscuits.

Creamy Buttermilk Ranch Dressing

by Ellie Weightman - good on salads or used as a vegetable dip

1/2 cup buttermilk

3/4 cup mayonnaise (reg or lite)
1/2 cup sour cream (reg or lite)
1/2 tsp dried parsley
1/8 tsp black pepper
1 1/2 tsp lemon juice
1/2 tsp vinegar
1 1/2 tsp garlic salt
1 1/2 tsp onion powder
1 tbsp sugar
1/2 tsp chopped chives
1/8 tsp celery seed

Combine all ingredients and mix well  with whisk.  Refrigerate overnight to incorporate.

IMPORTANT:  This dressing will only last a week or two in the refrigerate, mainly it depends on the date on the buttermilk and sour cream that you used.

Thousand Island Creamy Dressing

by Ellie Weightman - good in salads or on hamburgers

1 cup mayonnaise (lite or reg)
1/2 cup ketchup
1/2 cup sweet pickle relish
1 pinch salt
1 pinch black pepper

In a small bowl, mix together all ingredients with a whisk until combined.  Refrigerate overnight to incorporate.

Store in a glass mason jar and keep refrigerated.  Will last a few weeks in refrigerator.

Thursday, February 18, 2010

Zesty Honey BBQ Wings

by Ellie Weightman, adapted from RecipeZaar "Honey Barbecue Chicken Wings" #185892

Have lots of napkins, these are gooey and gooooood!

15 - 20 frozen chicken wings and drummies - thawed
Canola Oil

Dry Ingredients
1 tsp Kosher salt
1 tsp garlic powder
1/2 tsp paprika
1/2 tsp black pepper
1/4 tsp cayenne pepper

Sauce
1 cup smokey bbq sauce (Cattlemen's Smokey is good)
1/2 cup honey
2 tbsp ketchup
4 drops Tabasco sauce
4 tbsp butter
1/2 tsp garlic powder
1/8 tsp ancho chili powder
1/2 tsp onion powder
3 drops liquid smoke
2 tbsp dark brown sugar

Preheat oven to 375 degrees - you will have to raise the temperature after the first phase of baking.

Rinse and dry the wings with paper towels.  Mix all the dry ingredients in a small bowl. In a plastic bag, place the wings. Pour the dry ingredients over the wings and close and shake the bag. to coat all the pieces.

Line a cookie sheet with aluminum foil.  Pour a few tbsp of canola oil over the foil to coat evenly.  Place the wings in a single layer on the cookie sheet and place in oven for 20 minutes.   Turn the wings over and cook for 20 more minutes. 

As the wings are cooking, make the sauce by slowly simmering the sauce ingredients over low heat, stirring frequently.

When the wings are done baking, remove from oven and raise oven temperature to 400 degrees.  Carefully dip them in the sauce and coat generously.  Put them back on the cookie sheet, and bake 10 more minutes.
Serve.

Make ahead dry seasonings and store in airtight jar
9 tblsp kosher salt
9 tblsp garlic powder
4 1/2 tblsp paprika
4 1/2 tblsp black pepper
3 1/8 tsp ancho chili powder (optional)
3 1/8 tsp cayenne

for each batch of wings, use 3 1/4 tsp of the dry seasonings per batch of wings per the above recipe

Wednesday, February 17, 2010

Smothered Chicken Breasts

Smothered Chicken Breasts by Taste of Home

Jeanne Barger

These were yummy!!!  The only thing I changed was that I used 3 chicken breasts instead of 4 because I buy those frozen ones from Sam's and they are pretty big.

Ingredients:
4 boneless skinless chicken breast halves (6 oz each)
Salt
Lemon-Pepper Seasoning
1 Tablespoon Canola Oil
8 Bacon Strips
1 Medium Onion, Sliced
1/4 cup Packed Brown Sugar
1/2 cup Shredded Colby-Monterrey Jack Cheese


Directions:
1 - Sprinkle chicken with salt and lemon-pepper.  In a large skillet, cook chicken in oil for 6-7 minutes on each side or until a meat thermometer reads 170 (pretty much until it's done).  Remove and keep warm.

2 - In the same skillet, cook bacon over medium heat until crisp.  Using a slotted spoon (I used a fork), remove to paper towels; drain, reserving 2 tablespoons drippings.

3 - In the drippings, saute onion and brown sugar until onion is tender and golden brown.  Place 2 bacon strips on each chicken breast half; top with caramelized onions and cheese.  Yield: 4 servings.

Wednesday, February 10, 2010

Stuffed Peppers

Stuffed Peppers by Jeanne Barger

This is Beau's absolute favorite meal.  He loves when I make these.  I got this recipe from allrecipes.com, but changed a little bit.  Sooo delicious.

4 green bell peppers (I actually used 2 green, 2 red)
salt to taste
1 lb ground beef
1/3 cup chopped onion
salt and pepper to taste
1 can diced tomatoes (I used fire roasted w garlic)
1 tsp Worcestershire sauce
1/2 cup uncooked rice
1/2 cup water
Cumin to taste
Chili Powder to taste
Garlic Powder to taste
1 cup shredded cheese (I used Colby Jack, but you can use cheddar)...Shred some extra cheese for topping.
1 can condensed tomato soup
water as needed

1.  Bring a large pot of salted water to a boil.  Cut the tops off of the peppers and remove the seeds.  Cook peppers in boiling water for 5 minutes, drain.  Spring salt inside each pepper and set aside.

2.  In a large skillet, saute beef and onions until beef is browned.  Drain excess fat and season with salt and pepper.  Stir in the tomatoes, rice, 1/2 cup water, Worcestershire Sauce, garlic powder, cumin, and chili powder.  Cover, and simmer for 15 minutes, or until rice is tender.  Remove from heat, and stir in the cheese.

3.  Preheat the oven to 350 degrees F.  Pour tomato soup into bowl and combine with just enough water to make the soup a gravy consistency.

4.  Stuff the peppers making layers of beef, then soup, then beef, then soup.  Once pepper is filled, top with cheese.

5.  Bake covered for 25 to 35 minutes, until heated through and cheese is melted and bubbly.

Enjoy!

Vanilla Sugar

by Ellie Weightman

1 cup granulated sugar
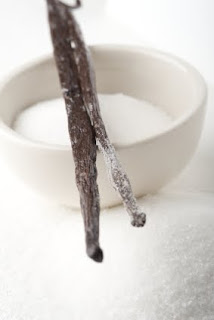
1 vanilla bean stalk

Have a plastic container large enough to hold a few cups of sugar ready with a tight fitting lid.

With a sharp paring knife, split the vanilla bean down the center being careful not to cut in half. Open the pod and using the edge of the knife, scrape out the tiny black beans. Put the beans right in to the sugar and stir well. Add the empty bean stalks, stir and bury the stalks in the sugar. Cover tightly and let sit for two weeks. You may want to occasionally stir the sugar to avoid clumping.

You can increase your recipe using 1 stalk for every 2 cups of sugar.

As your sugar gets low, just add more sugar and stir and again allow to sit for 2 weeks.

Vanilla sugar can be used in any recipe where you use white granulated sugar. It is excellent in coffee, tea, cake recipes – almost anywhere you would use the granulated sugar. Yes you will have black beans, but that is the beauty and flavor of real vanilla.

Hint: Remove some of the sugar to a Mason Jar or other jar with a tight lid and use everyday. Add more sugar to the vanilla bean container, stir and wait 2 more weeks to replenish your mason jar. After a while you will have to replace the bean stalks with fresh vanilla bean pods, but they can be used over and over again.

Sunday, February 7, 2010

Macaroni & Cheese

by Ellie Weightman

2 cups uncooked macaroni
2 ½ cups milk*-can use whole, low fat, skim or a substitute of (1 can evaporated + 1 can water)2 tbsp cornstarch
¼ tsp ground mustard or 1 tsp Dijon mustard
½ tsp salt
Dash pepper
2 tbsp butter / margarine
8 oz cheddar cheese, shredded
1 tsp dried parsley, more or less to your liking
Paprika
Bread crumbs

Preheat oven to 375ยบ

Cook macaronis according to directions, drain. Put aside.
In saucepan, add butter, milk, cornstarch, mustard, salt, pepper. Cook over medium low heat, stirring constantly to avoid sticking to pan and cornstarch clumping – a whisk is best.

When the milk starts to look like it is going to bubble/boil, turn off heat but keep on the same burner. Add the cheese and parsley and stir until melted. Taste and add more cheese, salt, pepper or mustard to your liking.

Put the cooked macaronis in a 2 quart casserole dish. Pour over the cheese sauce and stir to blend well. Sprinkle bread crumbs on top, the amount to your liking. Lightly sprinkle paprika on top.

Bake 35 minutes uncovered.

* This recipe can be made with any of those milks, however, the thicker the milk, the thicker the cheese sauce. I actually make with skim milk and it is fine but some like it thicker and creamier.

Excellent Way to Wrap Meat for Freezer

by Ellie Weightman

I have tried many ways to wrap my meats after going to wholesale stores and stocking up on meats. I have tried the zipper lock bag method (which still gives me frosted meat) and the machines that suck the air out of those expensive bags made for the machines only to find that I was spending loads of money on those specialty bags and a lot of time trying to get the unit to work properly.

A few months ago, I saw an alternative, old fashioned method on a cooking show and have tried it now for about 6 months and it is the only way I will store my meats in the freezer from now on. Initially it may cost you a bit, but each time you unwrap your meat you will find nice, pink non-frosted pieces of meat (except the poultry of course) and will be glad you made the change.

1. Go to a wholesale chain like Sam's Wholesale Food Club. Look in the aisle where they sell the restaurant size food storage items. I invested in the big box of heavy duty aluminum foil (restaurant size) and a big box of the restaurant style plastic wrap (I believe both of the ones I bought were Bakers & Chefs brand). Use this ONLY for freezing your meats or other items you plan on freezing for long period storage.

2. Divide your meat into meal size portions and wrap in the plastic wrap - tightly to make sure you remove all air gaps.

3. Wrap each of these pieces of meat that you pre-wrapped in plastic wrap in a piece of the aluminum foil - trying to keep one side free of wrinkles so you can label it.

4. Mark each piece for what is inside with a medium point magic marker - be careful not to smudge it before it dries.

5. Freeze

If you did this process the same day, or no later than one day after purchasing your meats, when you open them up to use you will find nice pink meat, no frost bite, no brown colored meat - the way it was when you packaged it.

I was pleasantly surprised how well this method works. It may take time to do it each time you bulk shop but is well worth the time. The overall cost of buying the two bulk wraps is also worth it in the long run. Do not use these boxes of wrap for your everyday usage, just for your bulk meat shopping. I store them in a closet and only bring them out when I do my monthly meat shopping.

 
Website Templates by Body Fat Caliper, Christmas Dress